
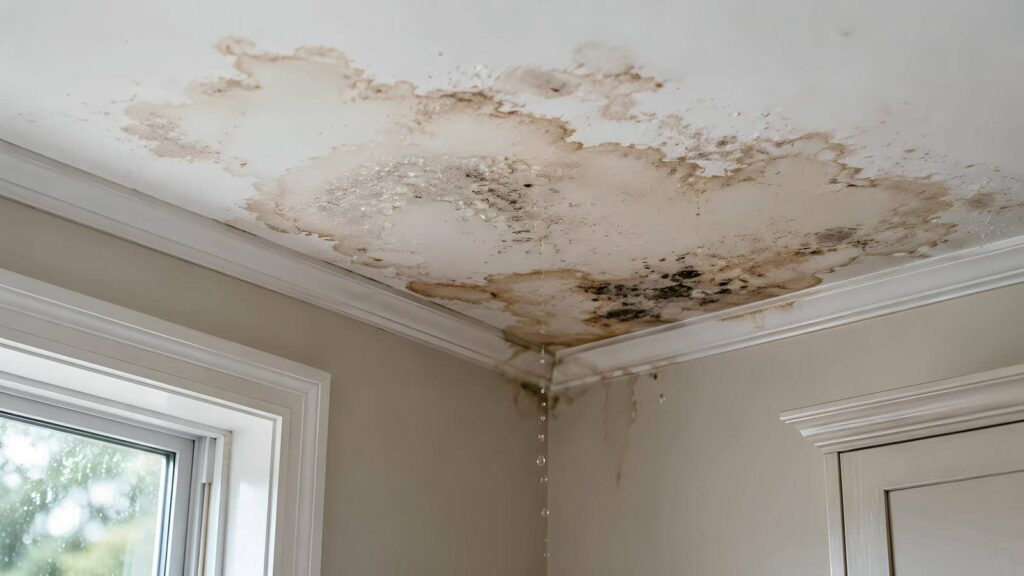
A small stain can signal a serious failure, and a soaked ceiling can hide a much larger problem. You need Ceiling Water Damage Repair to stop the leak, protect the room, and check for sagging drywall, cracked plaster, and wet insulation before you begin drying anything out. The repair depends on how deep the damage runs, and mold can start quickly if you miss one step.
Key Takeaways
- Stop the water source immediately, then protect furniture, flooring, and wiring from further damage.
- Assess stains, sagging, cracks, and soft spots to determine whether the ceiling needs drying or replacement.
- Dry the area thoroughly with fans and a dehumidifier, and remove wet insulation or debris if safely reachable.
- Cut out damaged material and inspect for mold, using protective gear and professional remediation for extensive growth.
- Repair leaks, seal flashing, clean gutters, and inspect plumbing regularly to prevent future ceiling water damage.
Stop the Leak and Protect the Room
Before you repair a damaged ceiling, stop the water source and protect the room right away. You’ll prevent further spread and keep your ceiling water damage repair work manageable.
If a roof leak is active, cover the damaged area from above only if you can do it safely; otherwise, call for help fast. For plumbing leaks, shut off the nearest valve or the main supply.
Move furniture, electronics, and rugs out of the area, then place plastic sheeting or tarps over what can’t be moved. Set buckets under drips and lay towels to catch runoff.
Turn off power to wet fixtures if water’s near wiring. Open windows if conditions allow, and keep your crew calm and coordinated.
Once the space is secure, you’re ready for the next step.
How to Assess Ceiling Water Damage?
You should first identify the stain pattern, since brown rings, spreading edges, or discoloration can show how long the leak’s been active.
Next, check for sagging, soft spots, or cracked drywall, because these signs suggest the ceiling has absorbed water and may be unstable.
Then trace the water source above the damaged area, including roof leaks, plumbing lines, or upstairs fixtures, so you can target the right repair.
Identify Stain Patterns
What do the stain patterns on your ceiling reveal? You can map the damage by watching color, shape, and spread. A yellow or brown ring often marks a slow leak that dried between events, while a darker center suggests ongoing moisture.
Broad, diffuse blotches usually point to a wider source, such as roof runoff or plumbing seepage above. Linear streaks can follow joists, seams, or drywall joints, so trace the pattern outward to find the entry point. If the stain keeps enlarging after rain or water use, the source is still active.
Photograph each mark, note its size, and compare changes over time. That record helps you speak clearly with your repair team and move forward with confidence.
Check Sagging Areas
After you map the stain patterns, check the ceiling surface for any sagging, bowing, or soft spots. Stand back and sight along the plane to spot uneven dips.
Then press lightly with a dry hand near the damaged area; a spongy feel means moisture may still be trapped in the gypsum board or plaster. Mark any sections that flex, crack, or separate at joints, because those spots can fail without warning.
If the ceiling has a pronounced bulge, keep clear of it and limit vibration from footsteps above. Use a flashlight to compare edges and seams, and note whether the affected area feels cool or damp.
Careful inspection helps you stay safe and gives your crew the same clear starting point for repairs.
Trace Water Source
Start by tracing the water source at the highest visible point of the damage, since ceiling stains usually travel away from the leak before they spread downward.
Then inspect the attic, roof penetrations, plumbing lines, and HVAC components above the stain. Look for active drips, wet insulation, rusted fasteners, or dark wood that marks a current path.
If you’re in a multi-level home, check the bathroom, laundry, or supply lines directly above the affected area. Use a flashlight and moisture meter to confirm suspect spots, and map the stain’s edges so you can tell whether the leak is still active.
If you can’t locate the source quickly, shut off nearby water and call a qualified pro. You’re not alone—this step helps protect your home and your crew.
Common Causes of Ceiling Water Damage
Ceiling water damage usually starts with a roof leak, a plumbing failure, or water from an upstairs bathroom, appliance, or spill that seeps into the ceiling assembly.
You may also see damage from clogged gutters, wind-driven rain, failed flashing, cracked supply lines, loose drain fittings, or overflowing tubs. HVAC condensate leaks and attic condensation can stain drywall too.
If you live in a multi-story home, even a small toilet overflow or washing machine leak above you can travel along joists before showing up below.
Watch for sagging, discoloration, peeling paint, or soft spots, because each points to active moisture or prior wetting.
When you know the source, you can choose the right repair, protect your home, and keep your space safe together.
Dry the Ceiling Safely
Before you repair anything, stop the source of water and dry the ceiling completely to prevent mold, collapse, and hidden structural damage.
Start by protecting the room, then increase airflow with fans and a dehumidifier. Keep windows open only if outdoor humidity is lower than indoors. Gently remove wet insulation or loose debris you can safely reach.
- Place fans to move air across the damp area.
- Run a dehumidifier continuously.
- Check for cool, soft, or sagging spots.
- Wear gloves and eye protection.
You’ll dry faster when you maintain steady circulation and monitor moisture daily. If the surface stays damp after 48 hours, you’re not done.
Stay patient, work methodically, and keep everyone in the home clear of the area until the ceiling feels fully dry and stable.
When to Replace a Water-Damaged Ceiling
You should replace a water-damaged ceiling if you see structural sagging, cracking, or loss of stiffness, because these signs can indicate compromised framing or failed drywall.
If stains keep returning after drying and repair, moisture is still present and the ceiling material may be too damaged to restore. In that case, you’ll need removal and replacement instead of another surface repair.
Structural Sagging Signs
If the ceiling starts to bow, dip, or pull away from the framing, treat it as a structural warning rather than a cosmetic issue. You need to inspect the area before you press on or add weight.
Sagging usually means the drywall, plaster, or fasteners have lost load capacity, and the ceiling may fail without much notice. You’ll know the risk is higher when you see:
- visible deflection across multiple joists
- cracked seams that widen under light pressure
- screw heads or nails popping through
- a soft, spongy feel at the span center
At that point, keep people out of the room and contact a qualified pro. Acting quickly helps you protect your home and stay with neighbors who know the value of safe, shared spaces.
Recurring Stain Damage
When ceiling stains keep returning after drying, the material usually has ongoing moisture exposure or has already lost enough integrity that patching won’t hold.
You need to trace the source first: roof flashing, plumbing, HVAC condensate, or trapped attic humidity. If the stain grows, darkens, or shows a yellow-brown ring after each repair, the ceiling board is likely saturated or contaminated.
You should replace the affected section when paint won’t seal it, the drywall feels soft, or seams reopen. Cut back to clean, dry material, then inspect insulation, framing, and fasteners before closing anything.
If you live in a home that’s already been through leaks, act early so your crew can restore the room safely and keep your space solid, dry, and dependable.
How to Repair Ceiling Stains and Cracks
Before you patch anything, stain and crack repair starts with dry, sound material: cut away loose paint, scrape damaged texture, and widen hairline cracks slightly so filler can bond properly.
Then seal the area with a stain-blocking primer so old water marks don’t bleed through. Fill cracks with joint compound or lightweight spackle, feather the edges, and let each coat dry fully before sanding smooth.
- Sand the repair flush with surrounding ceiling.
- Apply a second skim coat if the surface dips.
- Prime again over the patch for even coverage.
- Repaint with matching ceiling paint in thin, uniform coats.
You can restore a clean finish without overworking the surface. Stay methodical, and your ceiling will look like it belongs again.
How to Handle Mold After Water Damage
Even a clean-looking ceiling repair can hide a mold problem if the leak soaked drywall, insulation, or framing for long enough. You should inspect for musty odors, dark spotting, soft drywall, and recurring staining.
If you see any of these, don’t just paint over them. Cut out damaged material, bag it, and keep dust controlled with plastic sheeting and negative airflow if you can.
Wear gloves, an N95 or better, and eye protection. Clean exposed framing with a detergent solution, then dry the area completely with dehumidification and ventilation.
If mold covers a large area, keeps returning, or reached HVAC components, call a qualified remediation pro. Acting quickly helps you protect your home and stay in control.
How to Prevent Ceiling Water Damage
You can prevent most ceiling water damage by stopping leaks before they reach the ceiling surface. Inspect your roof after storms, seal flashing gaps, and replace damaged shingles quickly.
In the attic, check insulation, vent boots, and pipe joints for dampness. Inside, monitor bathrooms, kitchens, and laundry areas for slow drips and overflow risk. If you catch problems early, you’ll protect your home and stay part of the group that handles repairs calmly and confidently.
- Clear gutters and downspouts regularly.
- Test caulking around tubs, sinks, and windows.
- Insulate cold pipes to reduce condensation.
- Schedule annual plumbing and roof inspections.
When you see staining, sagging, or peeling paint, act fast. A small fix now can keep your ceiling solid, dry, and safe.
Frequently Asked Questions
When Should I Call a Professional for Ceiling Water Damage?
Call a professional when you see sagging, spreading stains, active dripping, mold, electrical issues, or damaged drywall. You’ll protect your home faster, avoid hidden structural problems, and get repairs done safely and correctly.
Does Homeowners Insurance Cover Ceiling Water Damage Repairs?
Yes, you’re often covered if sudden leaks, storms, or burst pipes caused the damage, but not neglect or wear. You should review your policy, document the ceiling, and call your insurer promptly.
How Long Does Ceiling Water Damage Repair Usually Take?
Usually, you’ll need one to five days, like waiting out a small storm. You inspect, dry, replace damaged materials, and repaint. Larger structural repairs can take longer, but you’ll know each step as it progresses.
Can I Stay in the Room During Ceiling Drying and Repairs?
You can stay in the room if crews’ve isolated the area, but you shouldn’t if there’s mold, wet drywall, or electrical risk. Ask for safe access, ventilation, and work zones before you remain nearby.
What Signs Mean the Ceiling Is Unsafe and Might Collapse?
Sagging, bulging, or cracking ceiling panels mean you’re at risk; about 1 in 4 water-damaged ceilings fail suddenly. If you hear creaking, see stains spreading, or feel soft spots, evacuate and call a professional immediately.
Wrap-Up
By acting quickly, you can limit the ceiling’s unplanned makeover and keep damage from spreading. Stop the source, dry the area, and inspect for soft spots, stains, or hidden mold. If materials are compromised, replace them before small issues become larger concerns. With careful repairs and routine checks, you’ll help your ceiling stay sound, dry, and ready for the next storm. A little maintenance now can save you from a bigger repair later.